


Pressure Sprayer, 5 L
Autumn Lawn Care
Seed Spreader
Grass Seed

Ok! Let's get one thing right, straight away. You do not get a level lawn by using a roller. Using a roller, simply gives you hard bumps and hard hollows - and all the bits in between.
In fact, unless you are going to carry out all of the other operations necessary for a first class lawn, you can get rid of the roller altogether - although I might concede that it is useful for a light run over before the first cut after the winter.
In actual fact, a lawn rarely if ever, 'grows' a bump! There are no logical reasons for a lawn to rise up in places to provide you with a bump! What generally (always) happens, is that the lawn sinks over time - sometimes taking a few weeks as is the case with new lawns, or sometimes over a period of several years, as soil naturally sinks in places as a result of natural earth movement (rare) and underground roots and organic matter decomposing.
Most lawn bumps and hollows are cause by natural soil settlement or erosion over years in the case of mature lawns, and over just a few weeks with a badly prepared surface for new lawns.
Sinking of the lawn can also be as a result of animal actions - not least moles or even ants burrowing under the lawn. In both cases, soil is removed. As in the case of moles, the soil is burrowed away to make tunnels, and deposited on the surface in the form of molehills. In the case of ants - to a lesser extent, the soil is bought up to the surface to form ant hills - thereby making room for the ants nest underground.
More often than not, there is not enough care taken with the soil base preparation before seeding or turfing a new lawn. Rarely is the compacting carried out properly, so this results in the lawn becoming uneven - sometimes in a matter of a few weeks - especially after heavy rain.
The main cause of unevenness in established lawns, is the natural decaying action that takes place below the soil. Sometimes just a few isolated roots from a dead tree. Sometimes a larger hollow as the result of a tree stump or similar being buried below the soil. It rots away over time, and soil sinks to take its place - lowering the turf in places at the same time.
Another cause, is where drainage ditches or similar have been dug out and the infill not compacted properly. Or even waterways finding a new route, and then washing away soil - again resulting in sinking and uneven surface above.
Usually however, it is simply an 'uneven' lawn that is the problem; so take the easy way out, and bring the hollows up to the level of the bumps.
Result = Even Lawn!
(For small hollows - which materialise as 'large bumps', simply carry out the last stages of the article on Top Dressing Lawns.)
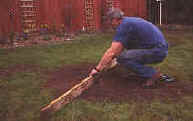
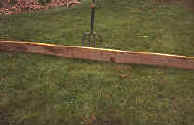
As you can see here, the lawn has 'hollows' of about 2 inches (remember them?) deep. (50mm). If you are a lateral thinker, then I suppose you could say that the lawn has 'bumps' which are 2 inches high! As we are dealing with hollows; it has 'hollows' and not bumps. It is much easier to view the hollow and bumps in the lawn by the use of such a straight edge. Sometimes a length of batten will be enough to determine the depth of the hollows.
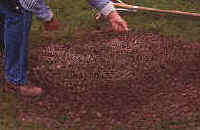
Judge and estimate how much Top Dressing Mix you are likely to need by running your straight edge length of timber over your lawn, this will show the gaps under the timber.
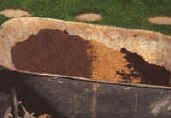
Prepare a Top Dressing Mix, I use equal parts of sifted top-soil, sharp sand and peat.
Mix well with a garden spade ideally in a wheel barrow.
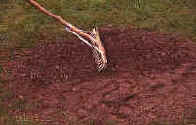
Apply the top dressing mix to the area, gently rake, filling in the hollows. Now we need a decent straight edge length of timber. (4x1in (100x 25mm) will be suitable - as is used in the picture. Use the straight edge to spread the top-dressing mix to a rough level by screeding the straight edge back and forth.

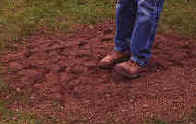
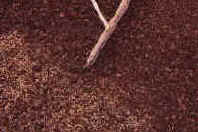
Once level, then compact the soil by treading with heels, until firm enough not to leave a foot imprint! Do this when the top dressing and soil underneath is dry and not soaked - as is sometimes the case with hollows. (If you do it on sodden soils, then you will need to read about 'compaction' in the lawn aeration article!)

Once the top dressing has firmed down, you will probably need to add a little bit more in stages until you get the top dressed hollow up to the level of the high spots. Rake to final level with as wide a rake as possible. Finish off the raking using the back of the rake as a screed tool. This should give you a good firm level surface on which you can apply your grass seed mix.

Spread the desired mix of seed at a rate of approx. 'a good handful per square yard'. Really scatter it about to ensure an even spread. Try to get the same type of seed mix as your existing lawn. Basically a 'normal' lawn will consist of Rye and meadow grasses. A fine lawn will normally consist of fescues, browntops and creeping meadow grasses. Don't be over worried - simply opt for a 'general mix' or a 'fine lawn' mix. Even if you can get the mixture absolutely right - highly unlikely - the newly dressed areas will take on a different appearance to the established lawn. After a year or so, it will all be virtually the same, for your normal maintenance schedule will have a large bearing upon how the lawn ends up.

Rake in lightly; protect with netting against birds; water when dry; and be patient for about 2 weeks. Hey presto, the grass starts to grow, and you now have a lawn that is (should be) more level than it was.

Care for your New Lawn - New lawns are like babies. They need more care and attention during the first few months and years of life. Many lawn fail because of lack of care in the first few days, weeks or months. New lawns take time to become established. Turfed lawns - whilst they look instant - are not much different to seeded lawns in that respect.
Watering, careful cutting, sparse feeding, and leave off with the lawn weedkiller for the first year or so. Give the lawn time to become established before inhabiting it with garden furniture, play pools and play equipment.
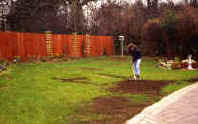
Large areas are best done with some help!
Pressure Sprayer, 5 L
Autumn Lawn Care
Seed Spreader
Grass Seed
The First Cut
The spring season is an important time for getting your lawn into top shape for the following months. What you do now in the spring by way of lawn care, will determine how well your lawn will cope with the wear and tear of day to day use, and also its ability to withstand drought or even water-logging during the summer months.
Lawn Care Main
Lawns take up a lot of time compared with most aspects of the garden. In spite of the time and care lavished upon lawns, many fail to live up to expectations. Maybe the expectations are too great to start with. Problem being, that next door and surrounding areas seem to have better lawns!
Throwing money at an established lawn or patch of straw is not always the best way forward - neither the most successful in terms of attaining the quality lawn that you want. It is always a good ide to take a step backward, to see what the problem really is with the lawn. More often than not it will be something to do with your lawn care regime.
Lawn Aeration
Not all lawns need aeration; but most do! Soil Compaction drives air out of the soil. A garden lawn is probably the most hostile environment provided by gardeners in furtherance of obtaining a beautiful garden. This is one reason for aerating a lawn. No other plant / grass are subjected to such willful abuse than the grass on the garden lawn, it needs care!
Top Dressing Lawns
Top Dressing of Lawns is beneficial. It encourages new basal growth of the grass plants - giving a thicker sward of grass. Top Dressing is also a good way to 'level out' the bumps and hollows in an uneven lawn.
Top dressing is normally carried out in mid spring. It can be done at any time in the growing season (March-October), but a dressing in the spring soon 'disappears' under the resultant lush lawn growth. Earlier in the growing season - but not in the autumn - a suitable fertiliser or feed can be added to the top dressing to give that little bit extra.

Lawn Problems
There are many and varied problems associated with keeping a good - or even reasonable - lawn. Quite often the problems are caused by something quite simple. That is, if you know what to look for! Describing a lawn problem seems to be beyond many of the people who write emails to me for help. A brown spot is a brown spot is it not? Well, err no, not always.

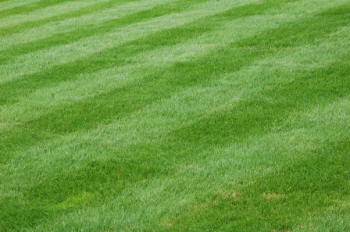
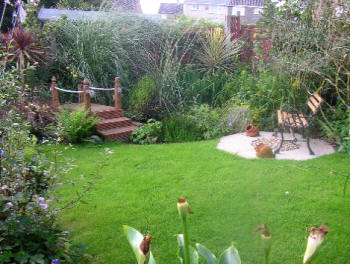
Bumps in the Lawn
Ok! Let's get one thing right, straight away. You do not get a level lawn by using a roller. Using a roller, simply gives you hard bumps and hard hollows - and all the bits in between.
In fact, unless you are going to carry out all of the other operations necessary for a first class lawn, you can get rid of the roller altogether - although I might concede that it is useful for a light run over before the first cut after the winter.
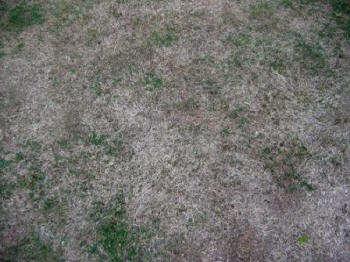
Brown Patches in Lawns
There are several causes of brown patches on lawns and other bare areas on the lawn, some are outlined below... Broadly, lawn brown patches can be split into three categories - depending upon the size of the patch. Recognising the size and shape of the patch - simple you might think - can go a long way in identifying the cause of the brown patch. I have had mails in the past where the write has claimed to have brown patches on the lawn, when in fact the entire lawn was brown - killed off by the wrong use of a certain weedkiller!
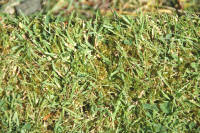
Lawn Moss Killer
If you really want to eradicate moss from your lawn, then you have to find out the actual problem that is causing it, rather than just treating it. The reasons are various, but not too difficult to isolate.
They can be one or several of the causes outlined below.
The latter is also available as a ready to use 'Moss Gun' for small patches. Neither do anything by way of treating the basic problem of moss in lawns. They simply are simply Lawn Moss Treatments - killing the moss which is there. It will return. You can alsouse lawn sand
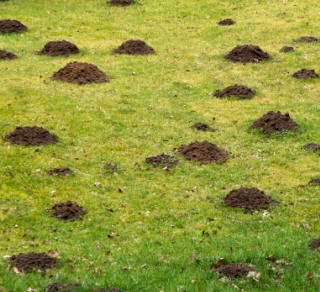
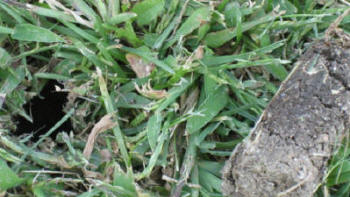
Moles in your Lawn
Moles are one of the most frustrating of all garden and lawn pests! They are rarely seen, but can cause absolute mayhem. The damage they do to plants is minimal, but if you are unfortunate enough to have moles in your garden, they will cause you more angst than an infestation of aphids! The main problem being, that they are so difficult to get rid of, and you normally see the damage they do, before you realize that you have a mole or so!
Cute little things they might be, but if your lawn is your pride an joy, or if it is just a nice lawn to sit and relax, the molehill trademark will soon turn you against them! One mole can wreak havoc in the garden, but a few and you have a potential disaster.
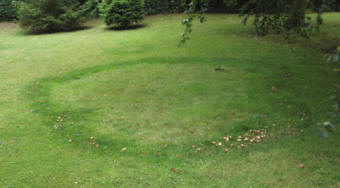
Fairy Rings in Lawns and Turf
Fairy rings in lawns normally start to show up in late spring or mid-summer. They then carry on growing right through until the autumn and usually into subsequent years. They are easily recognised by either of two or both trademarks. Once they have started, they will be visible throughout the year.
They are most commonly seen as dark green circles of lush grass in the lawn usually after they are a half a metre or so across, though they are visible at first as a tuft of dark green grass.
The Fairy rings may also be first noticed as a group of toadstools manifest in mid-summer. (Sometimes without the dark green grass!) Not all toadstools in the lawn are as a result of Fairy Rings.

Dogs Fouling Lawns | General problems
The main problem with dogs on lawns is that of the brown patches caused by bitches urinating. Male dogs are not such a problem in this respect, for they do it differently..
The brown patches tend to be a circular patch with bright green grass growing around the perimeter as the bitches urine eventually breaks down to Nitrogen, which then feeds the area outside the actual damage. The brown patch is basically scorching - similar to that caused by applying too much fertilizer - especially in dry conditions.
Treatment by soaking the area with water - immediately after the bitch has done the deed! Soaking the brown patches after they have formed will be absolutely essential if you are going to over-seed the patches.

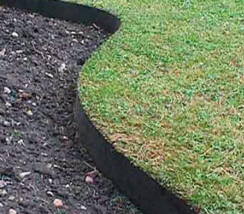
Lawn and Garden Edging
Garden lawns have to stop at some point, often causing a minor problem as to how to end or edge your garden with your lawn. Much will depend upon the style of your garden, but you will also have to take into account basic things like, the type of lawn mower you want to use, and even the basics of, how much time do you want to spend giving your lawn a neat finish!
It is not normally a good idea to simply end your lawn at the boundary of your garden edge; against a wall or fence. This will inevitably lead to either additional maintenance work - or an untidy finish, where the mower blade cannot quite get to the edges of the turf at the garden border edge.
Feeding Lawns
Feeding a lawn is a relatively simple operation, but so many get it wrong, or do it when it it not necessary! Here's how and when to do it; and what to use.
Each of the aspects are important. Do it at the wrong time and you could end up with a weakened lawn. Use the wrong feed and scorching or unhealthy grass can result.
The process that causes most problems, is simply that of putting your fertiliser on the grass! Uneven application leads to a patch lawn at best, and a ruined lawn at worst!
Lawn Thoughts
The big sign outside the garden store commanded WINTERIZE YOUR LAWN.
I've fed the lawn: I've watered the lawn: I've mowed the lawn: raked it and watched a lot of it die anyway. Now I'm supposed to winterize my lawn? I hope it's not too late.
Grass lawns have to be the stupidest thing we've come up with outside of the IRS! We constantly battle dandelions, Queen Anne's lace, thistle, violets, chicory and clover that thrive naturally, so we can grow grass that must be nursed through an annual four-step chemical dependency.
 Tweets by GardenSeekerG
 Hydrangea Petiolaris - Climbing Hydrangea | https://t.co/b7LmizQJvx https://t.co/FtsUGUZJPT
— GardenSeeker.Garden (@GardenseekerG) August 29, 2020